How to clean your EGR Ports on 88-91 Crx HF - Fuelly Forums

Click here to see important news regarding the aCar App

Go Back   Fuelly Forums > Tech, Troubleshooting and Repair > Experiments, Modifications and DIY
Today's Posts Search Click Here to Login
Reply
 
Thread Tools Display Modes
 
Old 08-08-2008, 10:30 PM   #1
Registered Member
 
Join Date: Feb 2008
Posts: 31
Country: United States
How to clean your EGR Ports on 88-91 Crx HF

So I spent off and on around a week mess around with my spare HF manifold. I had read past post of how to do this on an Accord or a Prelude but never the Crx HF.

I decided its pretty annoying not having a How to for a Crx so I made it. I thought I had more pictures of it. My intake manifold was off and I HIGHLY recommend doing the same if you want Great results.

The reason I say that is because there is NO way i would have been able to clean the ports this clean with them on the car.

In fact I had taken this intake manifold to the machine shop and had them dip it and as you can tell on this page the EGR ports were still completely clogged.

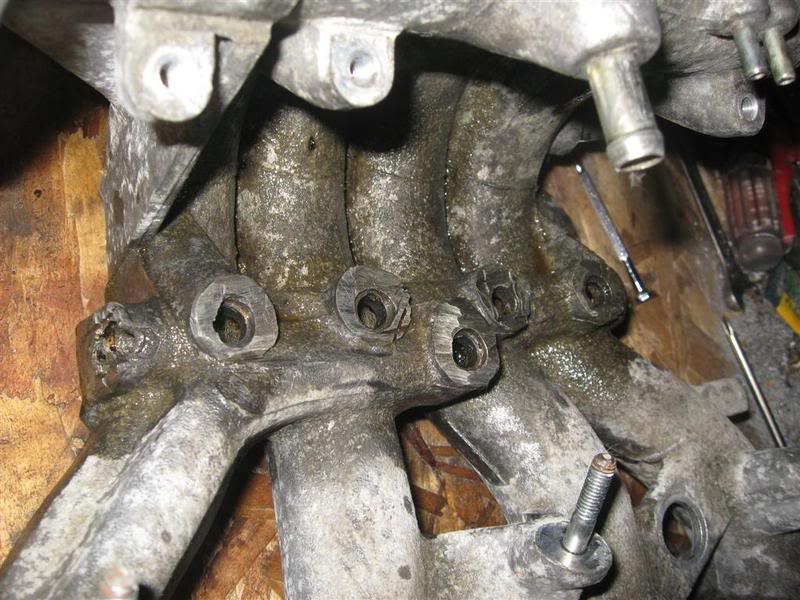
Here is the intake manifold with 1 port removed.


The trouble I had wtih this is that you are suppose to be able to drill into the port caps, tap them, bit a screw or bolt in it, and take a slide hammer http://www.buildingabeetle.com/images/tools26.jpg and pull it out that way.

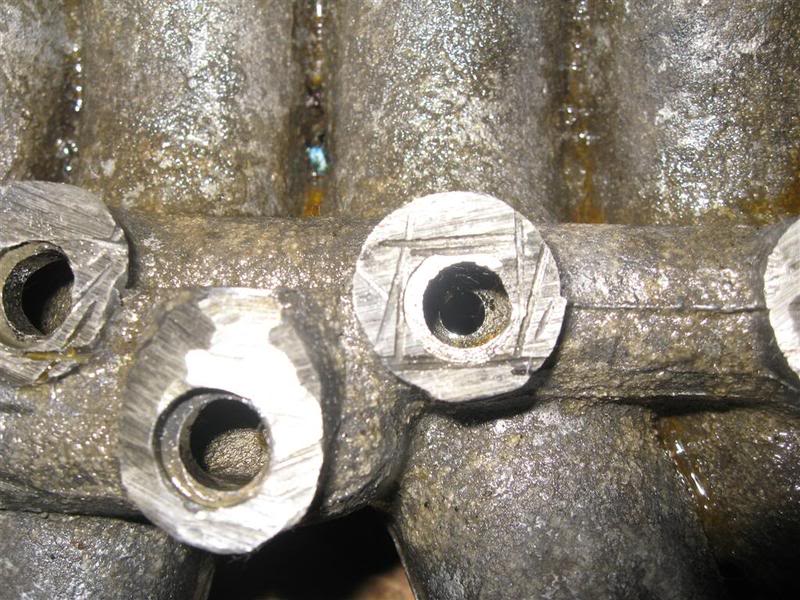
It wasn't happening. I ended up taking my dremel with a circular cutting bit and just kept cutting at it (sorry wish I had a detailed picture on this)

Here goes a side shot of how far I went down:
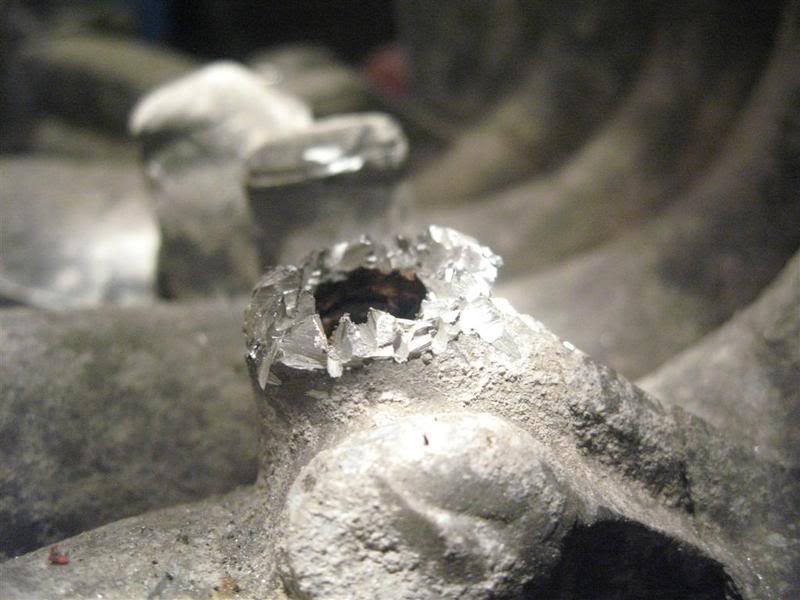

After its that far you should be able to drill in, tap, screw/bolt, and use a slide hammer or just a regular hammer (with the pry part) and pull it out that way.

here is one of the plugs out:
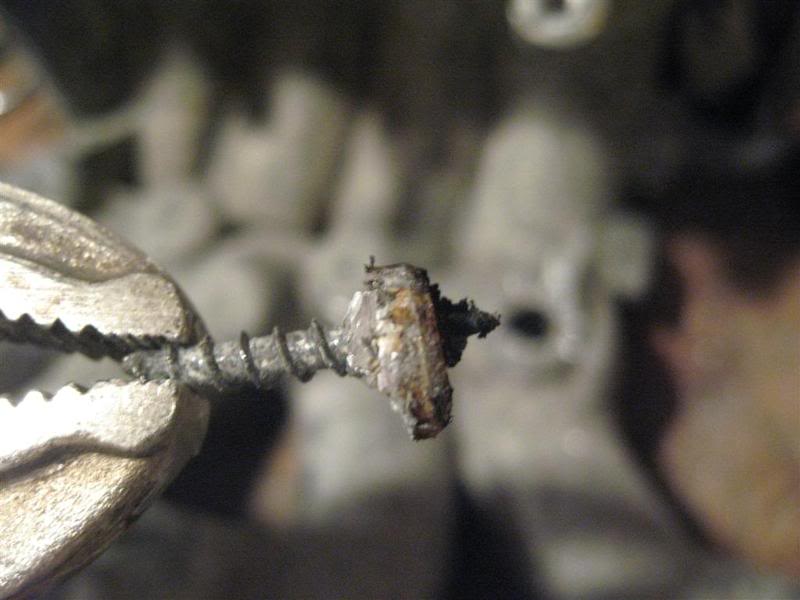

I did it to the 4 main ones and 2 secondary ones (at least thats what I called it, you will be able to see the other two a few pictures down with the ports cleaned)

In this picture you can see all 4 main ports. The reason they are black is because they are filled with carbon. COMPLETLY FILLED.
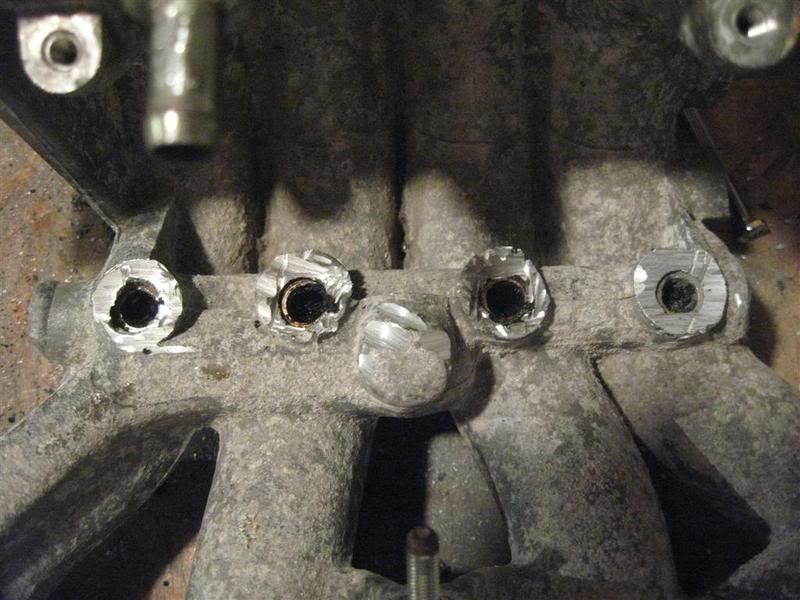

What I had used to clean these ports out were as followed:
Brake Cleaner (worked a little)
Coat Hanger (broken carbon up but didn't really move it)
Carb/Throttle Cleaner (worked a little better)
Used a screwdriver (worked well)

After failed attempts I ended up taking Stove Degreaser, make sure its safe on aluminum, and sprayed it in there. I just kept spraying then letting it sit for awhile and then sprayed some more. I sprayed in all the ports and I also sprayed in where the EGR valve sits (those ports).

Then I took a hose and with pressure adapter I sprayed in there for awhile. I think i did that process twice.

Then I sprayed a little WD-40 in there to help lube up what I just got full of water (anti rust measures)

Here are the results of Degreaser and Water:
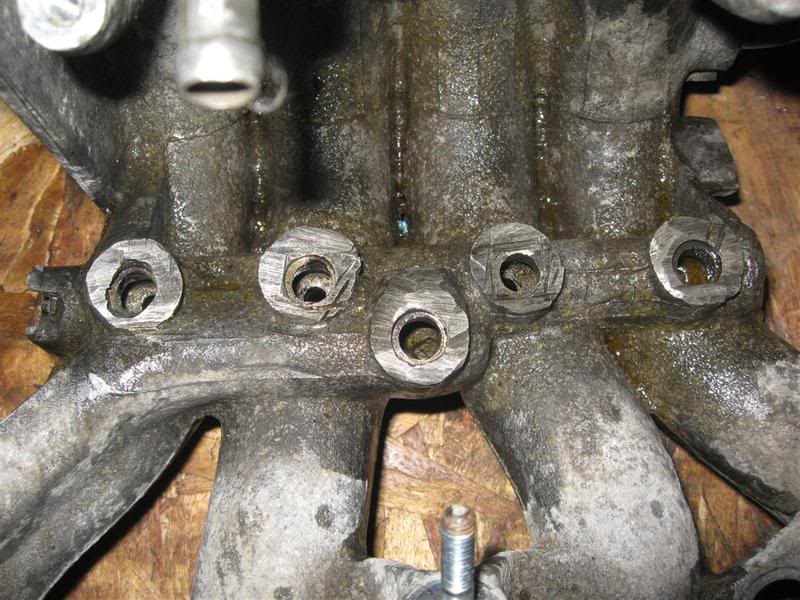


You can notice the 5th hole on top that I cleaned and if you look hard there is one on the left of the ports, on the side.

Now from here I took a route I wish I hadn't. I think the best thing to do is to tap and then put some bolts with sealant on them in those ports. That way you can always reopen and clean the Egr ports as time goes on.

I realized this after I sealed them up and this is how I did it:
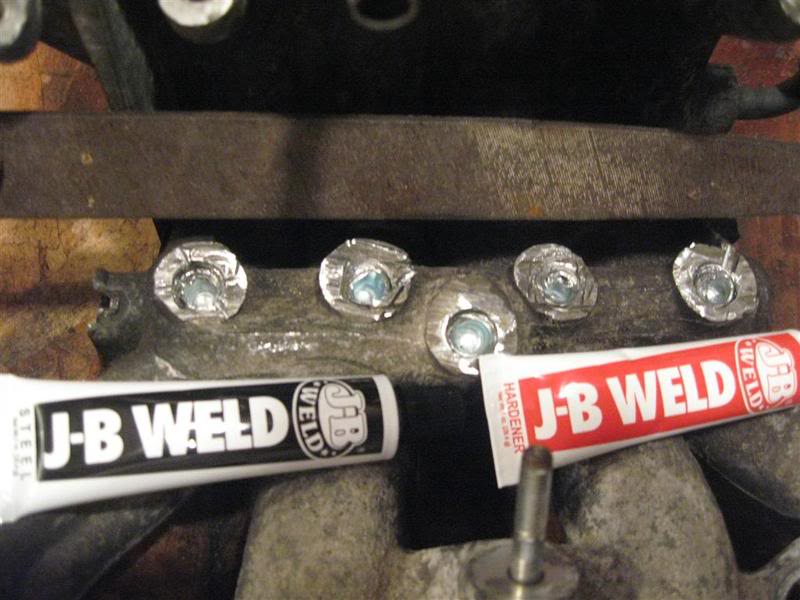

Those little shiny metal things are for an EGR port kit for a Prelude/Accord.
The part number for them are: P/N 07WAZ-001000A

The JB weld was used to insure there was no leakage:
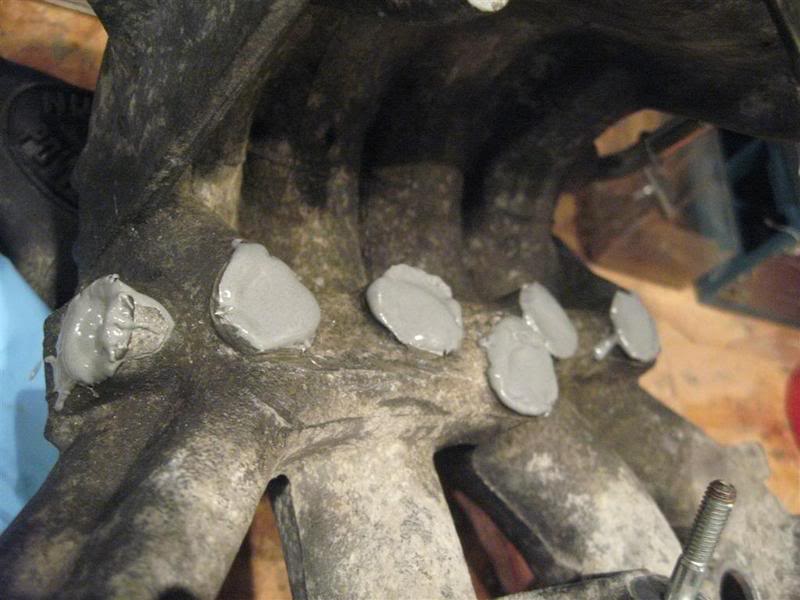

After the JB Weld had settled I took engine Primer and sprayed it down and then I took Engine Paint (cast aluminum) and sprayed it with that to make it look new)

While the intake manifold was getting worked on I had my fuel injectors reconditioned
These are my results for the work I had done at http://www.ravenworksllc.com
http://www.mnsportcompacts.net...73286


My fuel economy and power output has increased significantly. My car is a stock Crx HF that has 310,000 miles on it. My first test after this worked pulled in 39.9 mpg, I previously had been getting 36.3mpg. For some reason the tank I am on right now is on its way of being the best MPG I've had so far. I should have results in 2 days or say.

The 39.9 mpg is city and minimal highway driving. I have since taken a lot more measures on how I drive to get even better gas mileage.

Hope this helps.

Thanks,
Shane
__________________

vtecn8ive is offline   Reply With Quote
Old 08-11-2008, 11:16 AM   #2
Registered Member
 
Join Date: Nov 2013
Posts: 86
Country: United States
Thank you very much for posting this. This is exactly the type of article I'd been looking for when I wanted to clean the clogged EGR ports on my CRX HF. Although I ended up selling the car, this should be a great resource for the other CRX HF owners as I searched high and low and could not find anything specific to the HF.
__________________

roadsterbum is offline   Reply With Quote
Old 05-03-2009, 09:03 AM   #3
Registered Member
 
Join Date: May 2009
Posts: 1
Country: United States
Thanks, ever so much, for this post. This was my EXACT problem, when I failed my emissions test. The engine ran fine when I lifted my EGR diaphragm, so that was a big hint. Your pictures were "right on the money". I used a 3/8" drill, a circular cut off tool, and a slide hammer. I don't have a dermal tool. I took your suggestion and used bolts (I used 3/8" fine thread) and JB weld to seal the passages. A note to others, don't run these bolts too far into the passage or you'll create a blockage. A .45 caliber (handgun) cleaning brush woks perfectly to clean the passage. I'm not sure what kind of carburetor cleaner you used, but the carburetor cleaner I used worked perfectly. I admit, I let the clogged passages soak over night with carburetor cleaner. I was getting 40 m.p.g. in hard city driving. It will be interesting to see what the gas mileage does. Thanks a million Shane.
8000rpm is offline   Reply With Quote
Old 09-03-2009, 11:22 PM   #4
Registered Member
 
Join Date: Sep 2009
Posts: 3
Country: United States
Smile NPT plugs in HF intake manifold allow for future cleanouts

Shown is a cross-section from a spare HF intake manifold so I could see exactly what was going on and how thick aluminum was at places of interest for threading. 1/4 inch NPT plugs purchased from Summit Racing. I used a 4" grinder with a small diameter 80 grit flap disc to remove the seven welds. There was some trial and error with how deep to tap the NPT threads so that all NPT plugs were similar in height but not too difficult. Oven cleaner, carb cleaner, several bottle brushes, simple green, pressure washing, and the best starter was penetrating oil repeatedly applied and allowed to soak for a few days freed up most of the junk. I almost put the manifold in the dishwasher but thought this wouldn't be too healthy. Grey RTV silicone was used to seal the threads. Next time I'll use a drill press or mill to get the holes started straighter but everything was successfully done free-hand in the pictures here.
Attached Thumbnails
Click image for larger version

Name:	manifold cross section 1.JPG
Views:	640
Size:	97.1 KB
ID:	1371   Click image for larger version

Name:	manifold cross section 2.JPG
Views:	663
Size:	86.3 KB
ID:	1372   Click image for larger version

Name:	intake manifold no plugs 1.JPG
Views:	706
Size:	65.3 KB
ID:	1373   Click image for larger version

Name:	intake manifold no plugs 2.JPG
Views:	617
Size:	32.8 KB
ID:	1374   Click image for larger version

Name:	intake manifold plugs 1.JPG
Views:	1491
Size:	52.2 KB
ID:	1375  

GasSavers_aznative is offline   Reply With Quote
Old 09-03-2009, 11:26 PM   #5
Registered Member
 
Join Date: Sep 2009
Posts: 3
Country: United States
NPT tap had to be shortened

The center top hole required the NPT tap to be ground shorter. I did all the others first and then used the same grinder with a flap disc to shorten the tap about 5 threads. The NPT threads were started on this hole prior to grinding the tap. Hope this helps somebody.
GasSavers_aznative is offline   Reply With Quote
Old 04-27-2010, 10:46 PM   #6
Registered Member
 
Join Date: Feb 2008
Posts: 31
Country: United States
Getting ready to do this on my rebuilt Vx motor

Glad this has helped people and also inspired others to become equally (or more) creative than I.
vtecn8ive is offline   Reply With Quote
Old 04-28-2010, 08:11 AM   #7
Registered Member
 
GasSavers_TomO's Avatar
 
Join Date: Oct 2006
Posts: 1,108
Country: United States
Send a message via AIM to GasSavers_TomO Send a message via MSN to GasSavers_TomO Send a message via Yahoo to GasSavers_TomO
That's the best Idea I've seen for plugging the ports afterwards, AZnative.
Just to clarify, it looks like you used 7 of the 1/4" NPT fittings in anodized blue aluminum, correct?
__________________

Honda Civic VX Info/Links
Remember to use good Webiquette!
Quote:
Originally Posted by ezeedee View Post
controversy is an idea thought up by weak people who are too afraid to hear the truth.
GasSavers_TomO is offline   Reply With Quote
Old 05-17-2010, 01:54 PM   #8
Registered Member
 
Join Date: Feb 2008
Posts: 31
Country: United States
I did mine a little more ghetto this time around. Couldn't find any plugs that I wanted, so I jbwelded it up, drill and tapped some bolts in.

The flapper wheel definitely made life easier. I went with a rougher grit.
vtecn8ive is offline   Reply With Quote
Old 01-25-2011, 04:05 AM   #9
Registered Member
 
Join Date: Jan 2011
Posts: 1
Country: United States
Re: How to clean your EGR Ports on 88-91 Crx HF

Quote:
Originally Posted by TomO View Post
That's the best Idea I've seen for plugging the ports afterwards, AZnative.
Just to clarify, it looks like you used 7 of the 1/4" NPT fittings in anodized blue aluminum, correct?
yes, i agree
miketyson986 is offline   Reply With Quote
Old 07-23-2011, 05:30 AM   #10
Registered Member
 
Join Date: Jul 2011
Posts: 18
Country: United States
Re: How to clean your EGR Ports on 88-91 Crx HF

Hate to bring up an old thread but those Accord/Prelude plugs do NOT fit. I don't know how the OP got them to go in there, but I have destroyed 3 of them already trying to get them to go in there. Also, you will NOT mill the welds off unless you have a pretty long end mill which is going to go everywhere but the weld and eventually break. On the second hole, you have to do something about the PCV nipple hovering above the 2nd hole if you want to drill in there. Another thing, I don't know how anybody was able to get a 4" angle grinder in without tearing the manifold all to hell. I had to use a little air sander to get the welds off and boy that took a better part of 5 hours to do. Tapping the holes with a tap and using the NPT plugs is probably the best way to go here.
__________________

shag wagon is offline   Reply With Quote
Reply


Posting Rules
You may not post new threads
You may not post replies
You may not post attachments
You may not edit your posts

BB code is On
Smilies are On
[IMG] code is On
HTML code is Off
Trackbacks are Off
Pingbacks are Off
Refbacks are Off


Similar Threads
Thread Thread Starter Forum Replies Last Post
Is there a OBDI or OBDII conversion for older vehicles? kozaz General Fuel Topics 3 11-13-2007 08:32 PM
XFi mirror caps? baddog671 General Fuel Topics 4 07-10-2007 03:51 PM
Old Tires, Higher RR? Bill in Houston General Fuel Topics 16 05-26-2007 05:53 PM
The great news about the EPA's new tests repete86 General Fuel Topics 8 02-07-2007 07:01 AM
E-85 and EPA rating zpiloto General Discussion (Off-Topic) 7 09-26-2006 07:04 AM

» Fuelly iOS Apps
No Threads to Display.
» Fuelly Android Apps
Powered by vBadvanced CMPS v3.2.3


All times are GMT -8. The time now is 08:02 PM.


Powered by vBulletin® Version 3.8.8 Beta 1
Copyright ©2000 - 2025, vBulletin Solutions, Inc.