Civic VX Emissions Failure - VTEC Malfunction, or Hopelessly Epic Melodrama? - Page 3 - Fuelly Forums

Click here to see important news regarding the aCar App

Go Back   Fuelly Forums > Tech, Troubleshooting and Repair > Transmissions and Running Gear
Today's Posts Search Click Here to Login
Reply
 
Thread Tools Display Modes
 
Old 08-21-2009, 08:54 PM   #21
Registered Member
 
GasSavers_JoeBob's Avatar
 
Join Date: Oct 2007
Posts: 698
Country: United States
OK, I missed the link you had in your post.

If you can have your dad mentor you through the project, then all should be well.

Might not hurt to have a competent machine shop look at the head while it is off...check the valves, etc.

How are the rings and bearings? Since you are getting that far into the engine anyway...

If you go to a junkyard to get a replacement ECU, and they offer a warranty for it, it might not be a bad idea to go for it.
__________________

__________________
"We are forces of chaos and anarchy. Everything they say we are we are, and we are very proud of ourselves!" -- Jefferson Airplane

Dick Naugle says: 1. Prepare food fresh. 2. Serve customers fast. 3. Keep place clean.


GasSavers_JoeBob is offline   Reply With Quote
Old 08-22-2009, 04:29 AM   #22
Registered Member
 
theholycow's Avatar
 
Join Date: Apr 2008
Posts: 6,624
Country: United States
Send a message via ICQ to theholycow Send a message via AIM to theholycow Send a message via MSN to theholycow Send a message via Yahoo to theholycow
car-part.com lists junkyards with that ECU for $60 to $175. Chose "Computer box-engine" from the list, they don't list "ECU".
__________________

__________________
This sig may return, some day.
theholycow is offline   Reply With Quote
Old 09-23-2009, 05:07 PM   #23
Registered Member
 
Join Date: Apr 2008
Posts: 18
Country: United States
One month later, here is an update on the latest developments.

Electronic Control Unit - Exhaust Gas Recirculation Fixation
As I mentioned in my last post, the mechanic I took the car to told me that the EGR valves were not functioning properly, because of an ECU failure. I bought a replacement P07 ECU on ebay which was supposedly tested and fully functional for $80. Before swapping the ECU out, I went through the EGR valve troubleshooting steps on 11-34 to 11-39 of the 92-95 Civic Repair Manual, and indeed the EGR was not grounded properly. After swapping the ECU with its replacement, the same test indicated that it was now grounded properly. I took it back to get its emissions tested again, and the results were not that great. The NOx emissions were improved slightly (closer to 200, down from 300-800). The HC emissions at 25mph was improved slightly also, but still over limits. The lowest PPM measured was 92 at 25mph, and the max allowed to pass is 62.

Head Gasket Replacement
So my dad and myself went forward with the head gasket replacement plan. As I said above, the mechanic indicated that there was no oil pressure at the Spool Valve assembly, and that this was why the VTEC system was not engaging properly, and the reason for the CEL Code 22 (Oil Pressure Switch) coming on when engine conditions would normally result in VTEC crossover, if everything were working properly. The mechanic thought that the reason for the lack of oil pressure might be because of an improper head gasket being previously installed, resulting in oil being blocked from coming through passages that it needed to, in order to get to the Spool Valve Assembly. This always seemed a little far fetched to me, but we went ahead with the investigation.

So armed with an empty day in front of us, and a box of tools (10mm, 12mm, 14mm wrenches and sockets, torque wrench for torquing down the head bolts again, some pliers and wrenches and so forth), we started tearing apart my engine. I will include some pictures by way of visual explanation, as other people might find it useful.

We roughly followed the instructions for Cylinder Head Removal starting on page 6-28, and Cylinder Head Installation, starting on page 6-53 of the Repair Manual. We disconnected all hoses and electrical connections to the head. We drained the coolant (the engine coolant drain under the exhaust manifold was seized, so we had to use the radiator drain, and the lowest coolant hose going into the engine block to drain the coolant to a level below the head gasket. This ended up working fine.)

We removed the Timing Belt cover, and the valve cover, and set the Cam Pulley so that the "UP" mark was straight up, so that the first piston was at Top Dead Center. We were able to turn the engine over with just a wrench on the Cam Pulley retaining bolt, but we ended up moving it into position by putting the car into gear and rolling backward (reverse moves the cam pulley counter-clockwise, 1st or 2nd, clockwise). The Cylinder Head Removal instructions in the repair manual tell you to remove the timing belt completely, but my dad thought we could mark the exact position it was in, and just remove the Cam Pulley section of the belt, thus saving ourselves some work. This actually was successful. Here is a picture of what we did.

It looks pretty bad, but it actually worked okay. First we marked the Timing belt with Duct Tape in the exact positions of the 9:00 and 3:00 marks (using the "UP" mark as 12:00). This was accurate enough to put it back in the exact same divets. We unbolted the Cam Pulley, and pulled it out, while simultaneously sliding the timing belt back towards the block. Using two sets of hands, we kept upward pressure on the timing belt as we removed the pulley. We then had to figure out a way to lock it in place, so that it wouldn't get loose and slip on the Belt Tensioner or Drive Pulley. We used an available thing, and jammed it gently into the right side, which kept it from slipping back, and then another available thing on the other side, folding over (but not crimping) the slack at the top. This held it there.

We removed the Head Bolts in the order specified so as to not warp the head, and kept them in order. Note that removing the valves is not necessary for the removal of the head block.

This is the engine with the head removed... The cylinders don't seem too worn, as indicated by the lack of a ridge around the top, according to my dad.
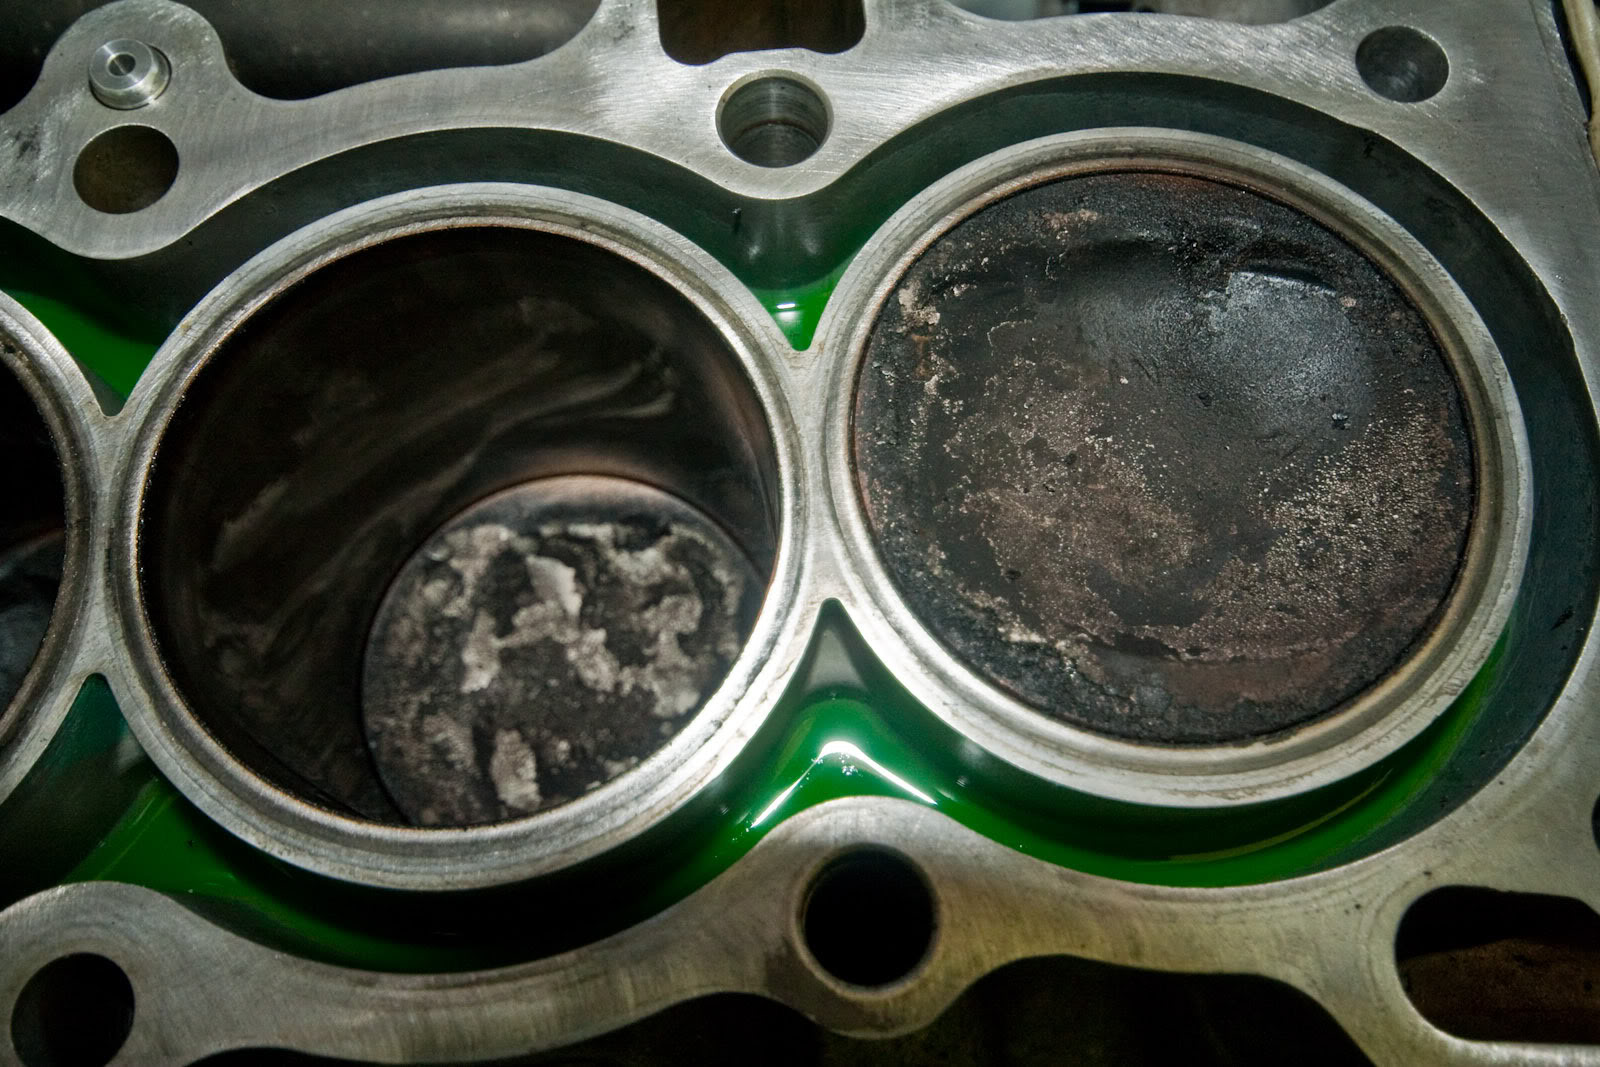

To my great lack of surprise, the head gasket was the correct type for the engine, being exactly matched to the replacement that I bought.


Here is the bottom of the head, displaying all of the holes in their correct locations. We were somewhat disheartened by this discovery, but at least we ruled it out as a cause of the VTEC problem.

We spent a while investigating the oil passages going to and from the Spool Valve Assembly, using a small air compressor to establish flow destination.
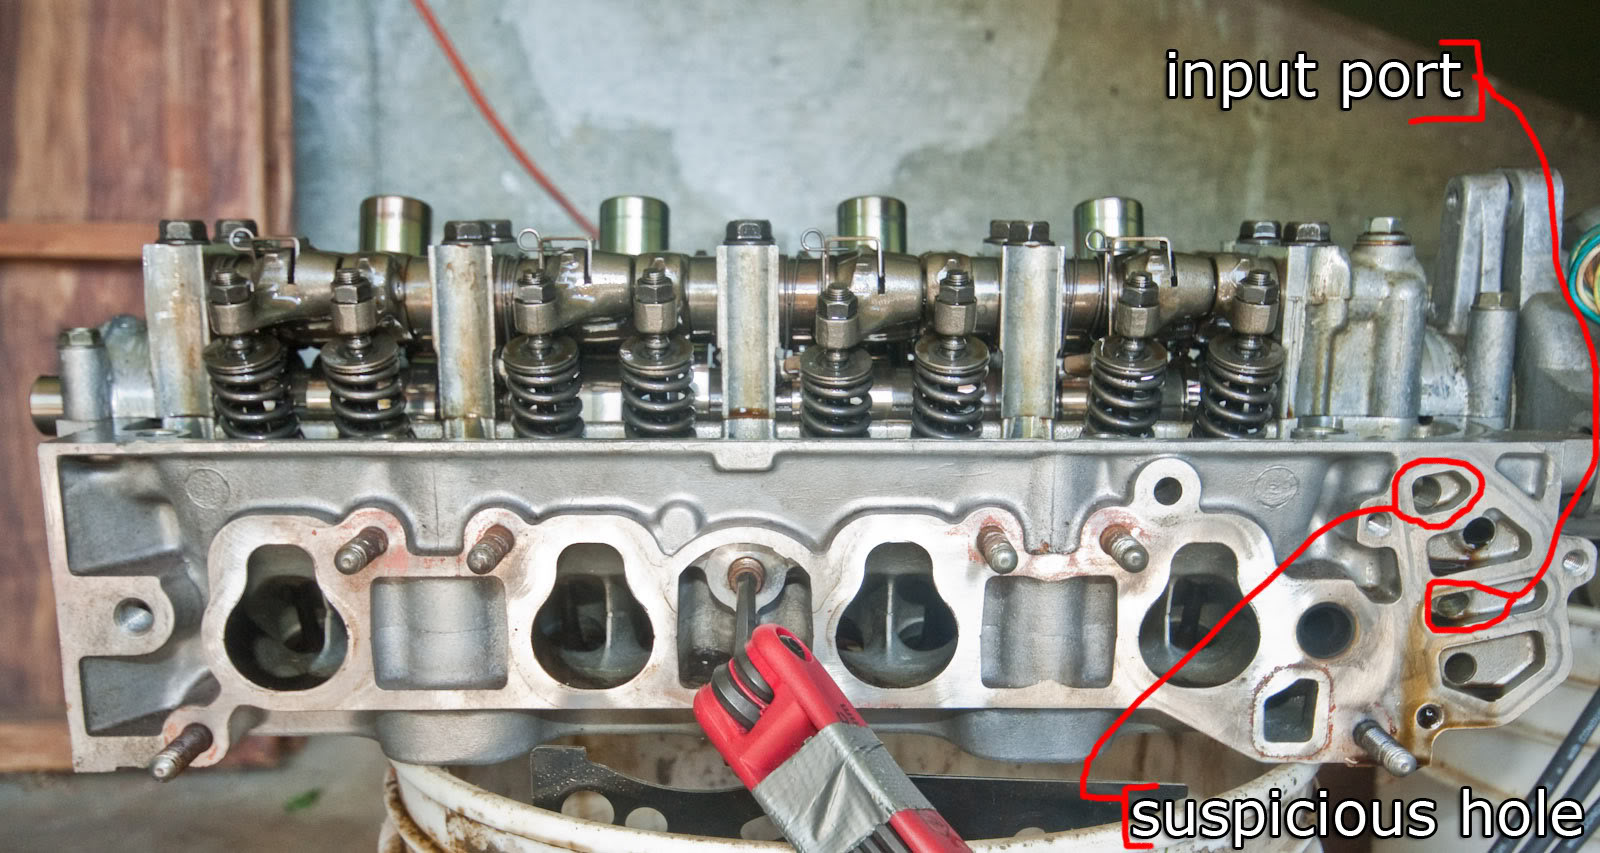
You can see the oil passageways that go into the Spool Valve Assembly at the right of this picture. The middle passage (2nd from the bottom) is the main input port. Oil comes up through an internal passageway from the input port that I assume comes up from the main oil reservoir. (this passageway goes past on the inside where the red allen wrench is stuck in there).

This passageway is visible here, as the little nipple looking thing in the center on the rear between pistons 2 and 3.

The passage third from the bottom goes into the rod above the camshaft that the valve rocker arms are attached to. I think this is where oil pressure goes in order to switch the VTEC on and engage the higher cam profile. We reasoned that the function of the Spool Valve Assembly was to switch between allowing and disallowing high oil pressure to get into this passageway.

I can't remember where the bottom passageway went.

The real interesting passageway though is the top passageway, which as you can see goes directly into the valve chamber on top of the head.

We re-assembled the engine with the new head and manifold gaskets, and after everything was in place except for the valve cover, we started the engine. It started right up, but after a second, my dad noticed oil starting to pour out of that top hole in the Spool Valve Assembly into the valve chamber. He thought this to be very odd, thinking that oil was going to be coming out of the tube that the rocker arms attach to, in order to lubricate them.

We immediately turned off the engine and investigated to make sure everything was on correctly and that we hadn't forgot anything. It was, and we hadn't.


A Question About Oil Flow
The mechanic was babbling on about how someone drilled a hole in the head near the spool valve assembly. At the time, I was just very confused, but I am wondering if this hole that goes from the top chamber of the Spool Valve Assembly into the Valve chamber on the top of the head block might not supposed to be there? Has anyone here seen the inside of a D15Z1 head block, and might they be able to tell me if that hole is supposed to be there? I can't seem to find any oil flow information on the engine. What do you all think?


Valve Adjustment
After the head was back on (and before we started the engine), we adjusted the valves. Interestingly enough, many of them were very tight.

I had adjusted them with a friend soon after buying the car, in order to see if the strange clicking sound that the car makes when in gear and accelerating (but not decelerating), and only when the car is started cold, was being caused by the valve lash being loose.

My friend had tightened them a bit too much, I think, because all of the valves were tight, and the exhaust valves on two different cylinders were almost 3/4 of a turn tight.

I'm not sure if the problem of tight valve lash would be enough to make the engine misfire and run rough enough to fail emissions, but the engine definitely feels like it runs smoother now. Before there was a rhythmic hesitation in the engine as it idled (very subtle, but noticeable), which is gone now.

Tightened valves still doesn't explain the abnormally elevated HC levels on the 25mph portion of the emissions test but not the 15mph portion... does it?

I am wondering if I should go back and get it retested again to see if the valve issue helped at all.
badur is offline   Reply With Quote
Old 09-23-2009, 05:57 PM   #24
Registered Member
 
GasSavers_bobski's Avatar
 
Join Date: May 2007
Posts: 463
Country: United States
If the valve lash was adjusted too tight, some of the valves may not have been closing all the way once the engine has warmed up fully. Who knows what that would do to the combustion process.
Also, valves rely on closing fully to cool properly. Contact with the seat on the cylinder head lets heat conduct away, rather than being forced to travel all the way up the stem to the valve guide. Overheated valves can warp and crack... Maybe you already did (too lazy to scroll up), but I would do a compression test to make sure everything is as it should be.

Where does the oil from your suspicious hole go in the cylinder head? Does it just run over to the nearest drain, or does it fill the galley under the camshaft or something? My copy of the '92 service manual appears to show a hole there on page 6-23 (spool valve inspection). Take a close look at the diagram that shows the valve, filter/gasket and mating flange on the cylinder head, as well as a mounting bolt with torque spec.
[edit]
Check out page 6-67 "Inspection Using Special Tools". I believe that relief hole is the one you're worried about.
[/edit]

One more thing... You're dealing with a D15Z1 block, right? That nipple thing on the block has a pretty big hole in it? Non-VTEC engines use a restrictor there to control oil flow into the cylinder head... That restrictor has to be drilled out or completely removed if a VTEC head is installed on a non-VTEC block.
GasSavers_bobski is offline   Reply With Quote
Old 09-23-2009, 09:22 PM   #25
Registered Member
 
Join Date: Apr 2008
Posts: 18
Country: United States
Quote:
Originally Posted by bobski View Post
If the valve lash was adjusted too tight, some of the valves may not have been closing all the way once the engine has warmed up...
Hi Bobski, thanks for the thoughts. You are definitely right about the Relief Hole being a hole with a legitimate existence. It looks like I missed that the first time around. It does definitely look like it is supposed to be there. The oil from it just seems to pool up at the bottom of the ... "valve chamber" just the space inside the valve cover, underneath the valve rocker arms and the camshaft and so forth. The excess seems to flow back into the oil ports, and get splashed around by the valve action. We weren't able to run the engine very long with the valve cover off, because the oil started to overflow over the edge near the spool valve.

Upon a pretty close visual inspection, the valves seem to look fine, but we will definitely do a compression test and see what we find out before bringing it back for yet another emissions test. If I am lucky, maybe the main remaining contributing factor causing emissions failure was the over-tightened valve-lash, and it will pass now.

The cylinder block has D15Z1 stamped on the outside of it, and there is nothing to indicate that the head is of a different model, so I am assuming that they are both of original stock origin. You can get a pretty good idea of the "oil nipple" size in the 3rd picture down in my last post. If I remember correctly, the size of the hole doesn't change from the exterior surface as it goes down.
badur is offline   Reply With Quote
Old 09-24-2009, 10:30 PM   #26
Registered Member
 
GasSavers_JoeBob's Avatar
 
Join Date: Oct 2007
Posts: 698
Country: United States
Yes, I'd go back and get it retested. Sounds like your valves might have been just barely not closing, which would cause it to not run quite right, and would have burnt your exhaust valves in short order.

Did you adjust the valves when the engine was cold? Does your book give two specs for the valves, one for cold and one for warm engine?

One of my dad's pieces of wisdom he passed along to me was "If you hear the valves ticking, you KNOW they are closing". I've usually tried to get them as close to spec as possible, but at least I don't worry if there is a little ticking.

BTW, really nice pictures.
__________________
"We are forces of chaos and anarchy. Everything they say we are we are, and we are very proud of ourselves!" -- Jefferson Airplane

Dick Naugle says: 1. Prepare food fresh. 2. Serve customers fast. 3. Keep place clean.


GasSavers_JoeBob is offline   Reply With Quote
Old 10-14-2009, 02:38 AM   #27
Registered Member
 
Join Date: Apr 2008
Posts: 18
Country: United States
Here is another update.

The compression test yielded no problem indications, in fact it tested very well for an engine with 190k miles on it. Each cylinder tested within 5psi of 200psi. The optimal number is 185psi ?20 for the D15Z1, if I remember correctly. ( this was tested with the ECU fuse in the under-hood fuse box unplugged, so that the injectors didn't spray fuel into the chamber, and with the throttle fully depressed, while cranking over the engine ).

I went back to get the car tested, allowing myself to raise my hopes slightly, and this is what I get:


Even worse emissions than before I did any repairs, in the NOx section, and slightly lower on the number that is making me fail -- the HC @ 25mph.

I took the car in to get it tested before we took the engine apart and replaced the head gasket, and adjusted the valves also. They didn't do an official test, but just ran it for a minute and gave me the numbers (for free). On this test, the HC was about the same as the above results, and the NOx were about 150 points lower on each.

This means that tearing the engine apart and adjusting the valves had no positive effect on the emissions results. However, replacing the ECU had an effect, bringing the HC @25mph down about 25 points.

Interesting, no?

I reason that the next thing to check off the possibilities list is the Catalytic Converter, since from what I hear, that device is also responsible for reducing HC, and maybe the engine running with an EGR that was not grounded properly by the previous faulty ECU caused the emissions to clog up the catalyst surfaces. ( this seems a long shot, given the un-changed emissions results pre and post EGR fixing (hopefully it is fixed?)).

I was going to take it to a muffler shop nearby to get it replaced tomorrow, when I happened across this thread, wherein suspendedhatch says
Quote:
Originally Posted by suspendedhatch
The lean burn engines (D15Z1 & D16Y5) produce a high level of NOx. Honda found it necessary to place the cat converter directly on the exhaust manifold for these motors in order to heat the cat converter enough that it can bring down NOx.
This makes me think that the muffler shop I'm going to probably doesn't have the proper Catalytic Converter in stock for my car like he thinks he does.
badur is offline   Reply With Quote
Old 10-14-2009, 07:51 AM   #28
Registered Member
 
GasSavers_TomO's Avatar
 
Join Date: Oct 2006
Posts: 1,108
Country: United States
Send a message via AIM to GasSavers_TomO Send a message via MSN to GasSavers_TomO Send a message via Yahoo to GasSavers_TomO
The OEM Catalytic Converter for the VX is only available from Honda...trust me I've searched all my parts connections. And it's not cheap, about $400+ last I checked.

You can go with THIS Maniverter for the 96-00 Civics and have your muffler shop install it.

Another option is to go with an aftermarket ebay header for around $40 and then get the regular catalytic converter for a Civic Si and have the shop install that. That option requires more fabrication than going with the 96-00 maniverter though.
__________________

Honda Civic VX Info/Links
Remember to use good Webiquette!
Quote:
Originally Posted by ezeedee View Post
controversy is an idea thought up by weak people who are too afraid to hear the truth.
GasSavers_TomO is offline   Reply With Quote
Old 10-14-2009, 09:54 AM   #29
Registered Member
 
GasSavers_bobski's Avatar
 
Join Date: May 2007
Posts: 463
Country: United States
Quote:
Originally Posted by TomO View Post
The OEM Catalytic Converter for the VX is only available from Honda...trust me I've searched all my parts connections.
RockAuto.com has one from Eastern Catalytic Converters (#40352) for $285.99 and one from Bosal (#099249) for $364.79. Unfortunately, those are both non-CA emissions cats (there's a difference?), so they won't ship to CA.
GasSavers_bobski is offline   Reply With Quote
Old 10-14-2009, 11:22 AM   #30
Registered Member
 
GasSavers_TomO's Avatar
 
Join Date: Oct 2006
Posts: 1,108
Country: United States
Send a message via AIM to GasSavers_TomO Send a message via MSN to GasSavers_TomO Send a message via Yahoo to GasSavers_TomO
Walker claims that they have a replacement as well, I've ordered it before and it's nothing more than a regular catalytic converter. It's frustrating that most aftermarket parts companies don't know that the VX is different.

It is good to see that the pic referenced on the RockAuto site does look correct.

It has also been three years since I've personally looked for a VX specific CAt too.
__________________

__________________

Honda Civic VX Info/Links
Remember to use good Webiquette!
Quote:
Originally Posted by ezeedee View Post
controversy is an idea thought up by weak people who are too afraid to hear the truth.
GasSavers_TomO is offline   Reply With Quote
Reply


Posting Rules
You may not post new threads
You may not post replies
You may not post attachments
You may not edit your posts

BB code is On
Smilies are On
[IMG] code is On
HTML code is Off
Trackbacks are Off
Pingbacks are Off
Refbacks are Off


Similar Threads
Thread Thread Starter Forum Replies Last Post
fueleconomy.gov occupant General Fuel Topics 5 01-02-2009 06:00 PM
Is there a OBDI or OBDII conversion for older vehicles? kozaz General Fuel Topics 3 11-13-2007 08:32 PM
DSG and CVT Erdrick General Fuel Topics 2 10-13-2007 06:41 AM
88 CRX HF tranny swap questions.... UfoTofU General Maintenance and Repair 31 04-09-2007 04:55 AM
Blast from the past: Mobilegas Economy Runs? Spule 4 General Fuel Topics 8 11-20-2006 08:47 PM

» Fuelly iOS Apps
» Fuelly Android Apps
Powered by vBadvanced CMPS v3.2.3


All times are GMT -8. The time now is 04:52 AM.


Powered by vBulletin® Version 3.8.8 Beta 1
Copyright ©2000 - 2024, vBulletin Solutions, Inc.